About two weeks ago, Hacker News was discussing a new R package called brickr, which relies on another relatively new and excellently crafted R package called rayshader to enable its rendering goodness. The latter package was originally constructed as a means to generate good-looking “2D and 3D hillshaded maps of elevation matrices using a combination of raytracing, spherical texture mapping, overlays, and ambient occlusion”.
Someone wondered whether this might be an appropriate tool to implement a Minecraft clone, to which I replied:
Like, playable and all? Very unlikely. It’s not going to be fast enough and R is not typically the language you’d use for games. But to e.g. import a Minecraft world and render it with the rayshader package? That might actually be a fun idea!
I decided to put my money where my mouth is an experiment with this for a couple of hours.
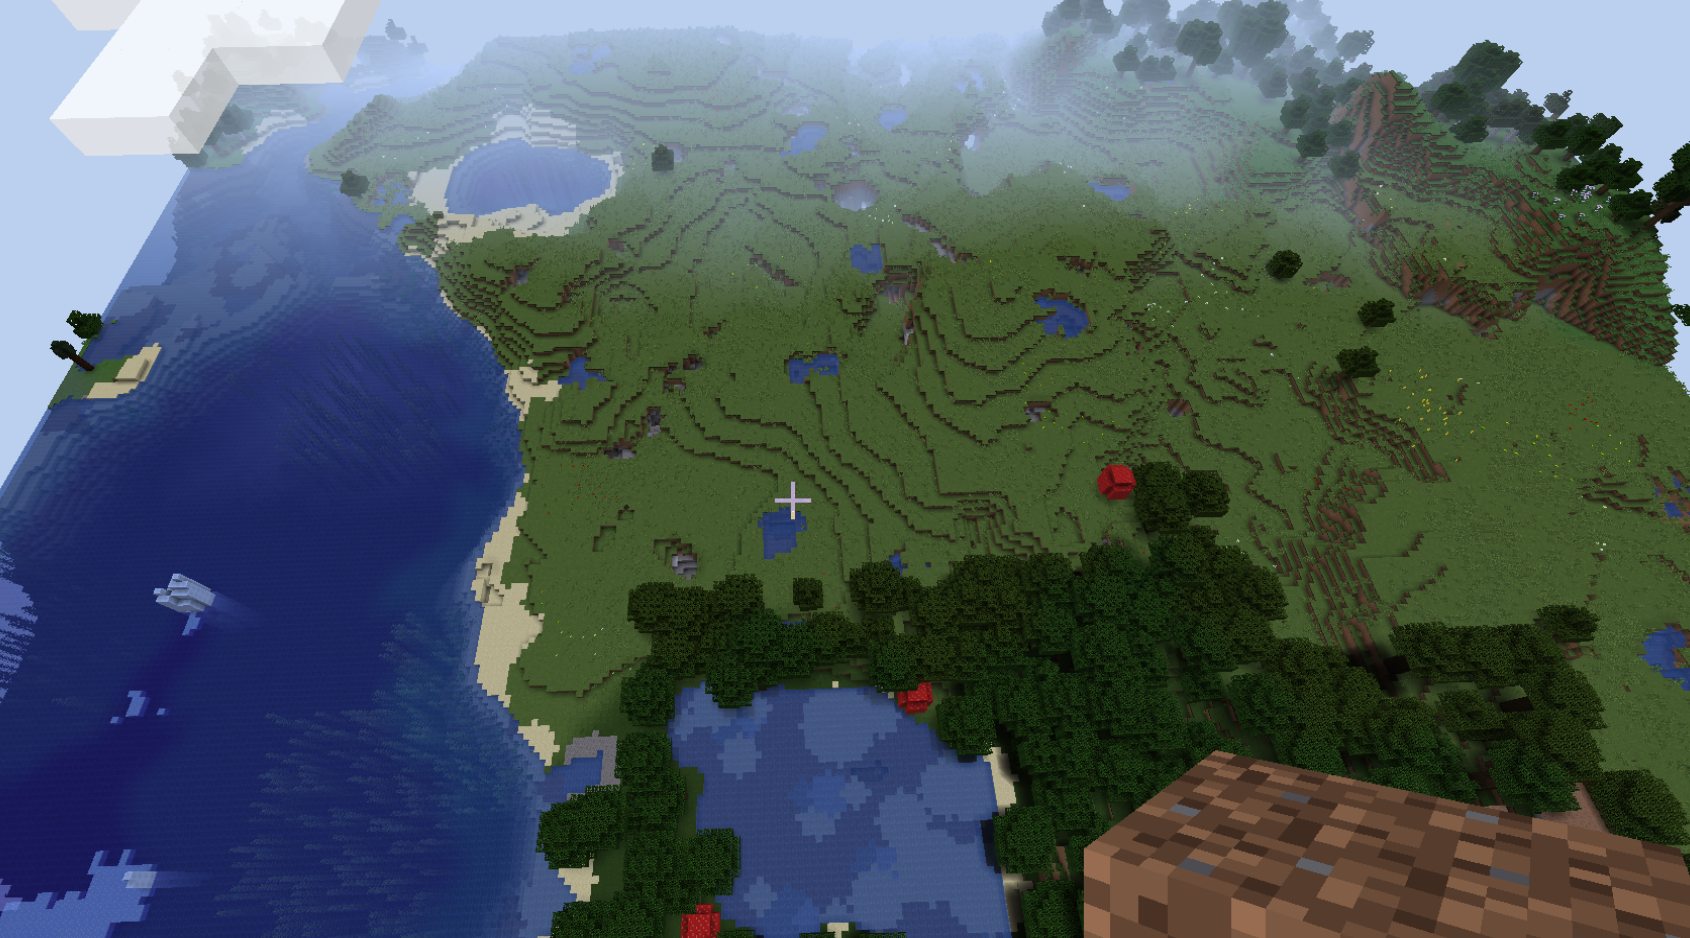
First, we need to come up with a map to generate. I whipped up a new Spigot server and surveyed a piece of landscape to use in Minecraft:
The next question was how to extract map data from the game. There have been a number of tools constructed over the years on how to do so, with Mapcrafter and Chunky offering something very similar to what we want to do, albeit in R.
I toyed around a bit with the source code of Mapcrafter before going for an easier route. I maintain a Jython interface to Minecraft which offers full access to the Spigot API from Python, so I whipped up a quick Python script in order to extract a height map:
from mcapi import *

me = player('Macuyiko')
loc = location(me)

print(loc)

area_size = 128

x_range = range(int(loc.x) - area_size, int(loc.x) + area_size - 1)
z_range = range(int(loc.z) - area_size, int(loc.z) + area_size - 1)
y_range = range(255, -1, -1)

ignore_list = [
    Material.AIR, Material.GRASS, Material.TALL_GRASS, Material.CAVE_AIR,
    Material.OAK_LEAVES, Material.OAK_LOG, Material.BIRCH_LEAVES,
    Material.BIRCH_LOG, Material.DANDELION, Material.SEAGRASS, Material.POPPY,
    Material.OXEYE_DAISY, Material.WATER, Material.TALL_SEAGRASS, Material.AZURE_BLUET,
    Material.KELP, Material.KELP_PLANT, Material.OAK_PLANKS, Material.SUNFLOWER,
    Material.DARK_OAK_LEAVES, Material.RED_MUSHROOM_BLOCK, Material.DARK_OAK_LOG,
    Material.MUSHROOM_STEM, Material.PUMPKIN, Material.BROWN_MUSHROOM_BLOCK,
    Material.ROSE_BUSH, Material.SUGAR_CANE, Material.BROWN_MUSHROOM,
    Material.RED_MUSHROOM, Material.RED_MUSHROOM_BLOCK, Material.PEONY,
    Material.LILAC]

include_list = [
    Material.GRASS_BLOCK, Material.DIRT, Material.CLAY,
    Material.ANDESITE, Material.STONE, Material.SAND,
    Material.COAL_ORE, Material.GRAVEL, Material.GRANITE,
    Material.SANDSTONE, Material.IRON_ORE, Material.DIORITE,
    Material.PACKED_ICE, Material.ICE]

result_height = []
result_type = []

for x in x_range:
    result_height.append([])
    result_type.append([])
    print("Doing x-row %s" % (x,))
    for z in z_range:
        for y in y_range:
            block = WORLD.getBlockAt(x, y, z)
            if block.type in ignore_list:
                continue
            elif block.type in include_list:
                result_height[-1].append(y)
                result_type[-1].append(block.type)
                break
            else:
                print("Don't know what to do with %s" % (block,))
                exit()

import csv

with open('results_height.csv', 'wb') as csvfile:
    csvwriter = csv.writer(csvfile)
    for row in result_height:
        csvwriter.writerow(row)

with open('results_type.csv', 'wb') as csvfile:
    csvwriter = csv.writer(csvfile)
    for row in result_type:
        csvwriter.writerow(row)
This script basically goes over a grid of (x,z) values (according to Minecraft’s coordinate system) and iterates over the y-values from top (sky) to bottom, until it finds a solid block.
Note the usage of the ignore_list and include_list. I basically wanted to skip over some block types which I did not want to include in the landscape, such as tree blocks, flowers, and so one. I also skip over water blocks as I want to render these using rayshader.
At the end, a CSV file is obtained which height values for each location. We can then render this in R as follows:
devtools::install_github("tylermorganwall/rayshader")

library(rayshader)
library(dplyr)

elmap <- read.csv('c:/users/seppe/desktop/results_height.csv', header=F) %>% as.matrix

shadow <- ray_shade(elmat, zscale=1, lambert=FALSE)
ambient <- ambient_shade(elmat, zscale=1)

elmat %>%
  sphere_shade(texture = "imhof1", zscale=1) %>%
  add_shadow(shadow, 0.5) %>%
  add_shadow(ambient, 0.5) %>%
  plot_3d(elmat, zscale=1,
          windowsize=c(640,400),
          water=TRUE, waterdepth=64, wateralpha=0.5, watercolor="lightblue")

render_snapshot()
Resulting in the following picture:
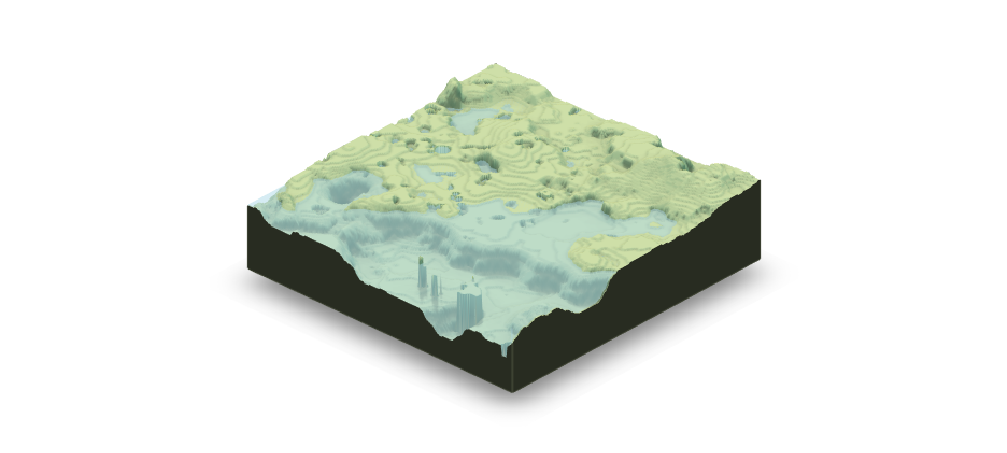
Note that there are several possibilities for improving:
- Water is just set at the fixed level of 64 (the level Minecraft uses for water), though this ends up filling caves where there is no water in the Minecraft world. An alternative approach would consist of rendering everything including water blocks manually
- To do so, one would also have to construct their own color map to use as the shader, instead of relying on the built-in “imhof1” texture map (e.g. by mapping all block types to a color that matches well)
- Additionally, you could even construct a map consisting of all blocks in the area, instead of just the top-most one. This would effectively boil down to the same strategy that
brickruses to render more complex models. It’s not really well documented inrayshader, but it seems to be possible to render multiple height levels on top of each other through multipleplot_3dcalls