

Summary and Changes
This post describes how you can create a Python interpreter for a CanaryMod Minecraft server, providing access to the full internal Canary API (CanaryLib). Commands are issued on a separate console window and do not require players or server administrators to be running the game itself.
Following list provides an overview of changes:
- 2015-01-21: Initial version.
Introduction
About two years ago (man, time flies), I wrote a blog post about setting up a Python shell which allows you to interact with a running Minecraft server using the full arsenal of the Bukkit API. I’ve gotten some nice comments, even although it was not very clear for some people what the goal was. E.g. “Doesn’t ScriptCraft already do this?” Answer: yes, although by means of hooking commands “using /js and through a JavaScript interpreter”. In my project, I wanted Python and avoid the whole hooking mess (also, I wanted to avoid that you should be logged in to the server as a player in order to run commands).
Sadly, though, the Bukkit people encountered some legal issues and have ceased developing their server implementation. When this came to my attention, I did some browsing around and it looks like the CanaryMod project is now the de facto way to go to set up servers with modding support. The API even looks similar to Bukkit.
So to re-iterate, here’s what we are going to be making… We’re thus going to create a Canary (I use “Canary”, “CanaryMod” and “CanaryLib” interchangeably here) plugin which gives server administrators or programming students direct access to the full Canary API. The actual plugin is actually very simple, thanks to the magic of Jython, a Python implementation in Java which allows for Python<->Java crosstalk and saves us from having to implement any command in the plugin itself. Commands are issued on a separate console window and do not require players or server administrators to be running the game itself.
To provide an example of what this means, let’s say you want to make a plugin which makes it rain. Normally, you’d make a plugin which binds this to a player command, say, /rain and would execute the following:
Canary.getServer().getDefaultWorld().setRaining(true);
That’s nice in case your goal is to deliver a packaged plugin with a well defined set of functionality, but what if a server administrator would like to make it rain, just because they feel like it. Normally, they’d need to search for a plugin which allows them to do this, install it, restart the server, and type \rain into chat. What our Python console will allow is just to type:
>>> from net.canarymod import Canary
>>> s = Canary.getServer()
>>> w = s.getDefaultWorld()
>>> s.broadcastMessage("I'll make it rain now")
>>> w.setRaining(True)
The video below shows some more action shots, including changing the time, weather, creating explosions, lightning, and placing blocks. Read on in case this catches your interest.
Developing the Plugin
We’ll be creating a Canary plugin which will spawn a server listening for incoming connection requests to obtain a Python interactive console, as well as showing a GUI console for the local administrator. In case you just want to get started as quickly as possible with the plugin, you can skip this section.
First of all, we’re going to create a new Java project in Eclipse. I’ll call this CanaryConsole. We create a Canary.inf file in the project root with some basic information:
main-class = com.macuyiko.canaryconsole.MainPlugin
name = CanaryConsole
author = Seppe vanden Broucke
version = 1.0.0
isLibrary = false
Next up, we create a lib folder in which we’re going to put our main libraries:
jython-standalone-*.jar: to be downloaded from the Jython web siteCanaryLib-*.jar: the Canary development API, which can be downloaded from here.CanaryMod-*.jar: the main Canary server.
Add these libraries to the build path.
As CanaryLib is a Maven project, it is also possible to follow the instruction over at the official site. In order to set everything up. I prefer to avoid working with Maven, so I just fetched all the dependency jars and put them in a deps folder.
The complete Eclipse project can be found over at GitHub, which you can just clone or download to get started.
Next, we’ll create the plugin classes themselves. Create a package under src called com.macuyiko.canaryconsole. We’re going to add two classes to start with.
MainPlugin.java, this class just loads the libraries from the lib folder and spawns a PythonConsole window:
package com.macuyiko.canaryconsole;

import java.io.File;
import java.io.IOException;
import java.lang.reflect.Method;
import java.net.URL;
import java.net.URLClassLoader;

import net.canarymod.plugin.Plugin;

public class MainPlugin extends Plugin {

    private final boolean guiconsole;
    private final boolean serverconsole;
    private final int serverport;
    private final String serverpass;
    private final int serverconns;

    public MainPlugin() {
        super();
        guiconsole = getConfig().getBoolean("canaryconsole.guiconsole.enabled", true);
        serverconsole = getConfig().getBoolean("canaryconsole.serverconsole.enabled", true);
        serverport = getConfig().getInt("canaryconsole.serverconsole.port", 44444);
        serverpass = getConfig().getString("canaryconsole.serverconsole.password", "swordfish");
        serverconns = getConfig().getInt("canaryconsole.serverconsole.maxconnections", 10);
    }

    @Override
    public boolean enable() {
        getLogman().info("Loading");

        try {
            File dependencyDirectory = new File("lib/");
            File[] files = dependencyDirectory.listFiles();
            getLogman().info("JARs found: "+files.length);
            for (int i = 0; i < files.length; i++) {
                if (files[i].getName().endsWith(".jar")) {
                    getLogman().info(" - "+files[i].getName());
                    addURL(new File("lib/"+files[i].getName()).toURI().toURL());
                }
            }
        } catch (Exception e) {
            getLogman().error(e.getMessage());
            return false;
        }

        getConfig().save();

        try {
            if (guiconsole) {
                getLogman().info("Starting Jython GUI console");
                new PythonConsole();
            }

            if (serverconsole) {
                getLogman().info("Starting Jython socket console server");
                SocketServer server = new SocketServer(serverport, serverconns, serverpass);
                Thread t = new Thread(server);
                t.start();
                getLogman().info("Clients can connect to port: "+serverport);
                getLogman().info("Using the password: "+serverpass);
            }
        } catch (Exception e) {
            getLogman().error(e.getMessage());
            return false;
        }

        return true;
    }

    @Override
    public void disable() {
        getLogman().info("CanaryConsole: Plugin disabled");
    }

    public static void addURL(URL u) throws IOException {
        // Horrible hack taken from:
        // http://stackoverflow.com/questions/60764/how-should-i-load-jars-dynamically-at-runtime
        // Fix if I figure out if there's a class loader in Canary
        URLClassLoader sysloader = (URLClassLoader) ClassLoader.getSystemClassLoader();
        Class<URLClassLoader> sysclass = URLClassLoader.class;
        try {
            Method method = sysclass.getDeclaredMethod("addURL", new Class[] {URL.class});
            method.setAccessible(true);
            method.invoke(sysloader, new Object[] {u});
        } catch (Throwable t) {
            t.printStackTrace();
            throw new IOException("Error, could not add URL to system classloader");
        }

    }
}
Note that injecting the libraries in lib is necessary to ensure that the plugin will be able to be aware of Jython while it is running. There are other ways to deal with this as well, such as just extracting the JARs in the final produced JAR file, if you prefer.
PythonConsole.java contains the following:
package com.macuyiko.canaryconsole;

import java.io.File;

import org.python.core.PyString;
import org.python.core.PySystemState;
import org.python.util.InteractiveInterpreter;

public class PythonConsole {
    public PythonConsole() {
        Runnable r = new Runnable() {
            public void run() {
                InteractiveInterpreter interpeter = new InteractiveInterpreter(
                        null, getPythonSystemState());
                String scriptname = "python/console.py";
                interpeter.execfile(scriptname);
            }
        };
        new Thread(r).start();
    }

    public static PySystemState getPythonSystemState() {
        PySystemState sys = new PySystemState();
        sys.path.append(new PyString("."));
        sys.path.append(new PyString("python/"));
        try {
            File dependencyDirectory = new File("lib/");
            File[] files = dependencyDirectory.listFiles();
            for (int i = 0; i < files.length; i++) {
                if (files[i].getName().endsWith(".jar")) {
                    sys.path.append(new PyString(
                            new File("lib/"+files[i].getName()).getAbsolutePath()));
                }
            }
        } catch (Exception e){}
        return sys;
    }
}
Just as before, I’m reusing a Jython GUI console by Don Coleman. We also need to ensure that all libraries in the lib folder get added to the system path for any Python interpreter we spawn.
There are two additional classes, SocketServer.java and ConnectionThread.java, which just allow users to login remotely and get a Python interpreter shell. Again, check GitHub. For all the details.
Installation
Installing the plugin is easy. Just export a JAR file from Eclipse, and dump everything in your CanaryMod folder:
- Your JAR file should be under
/plugins. - Create a
/libfolder next to/plugins(not in/plugins) and put the three JAR libraries from before here. - Create a
/pythonfolder next to/pluginsand place the Python console code here (see GitHub).
It is a good idea to change the server configuration to make sure players aren’t kicked off for inactivity. This allows you to play around while keeping an eye on the Minecraft world to see what is happening.
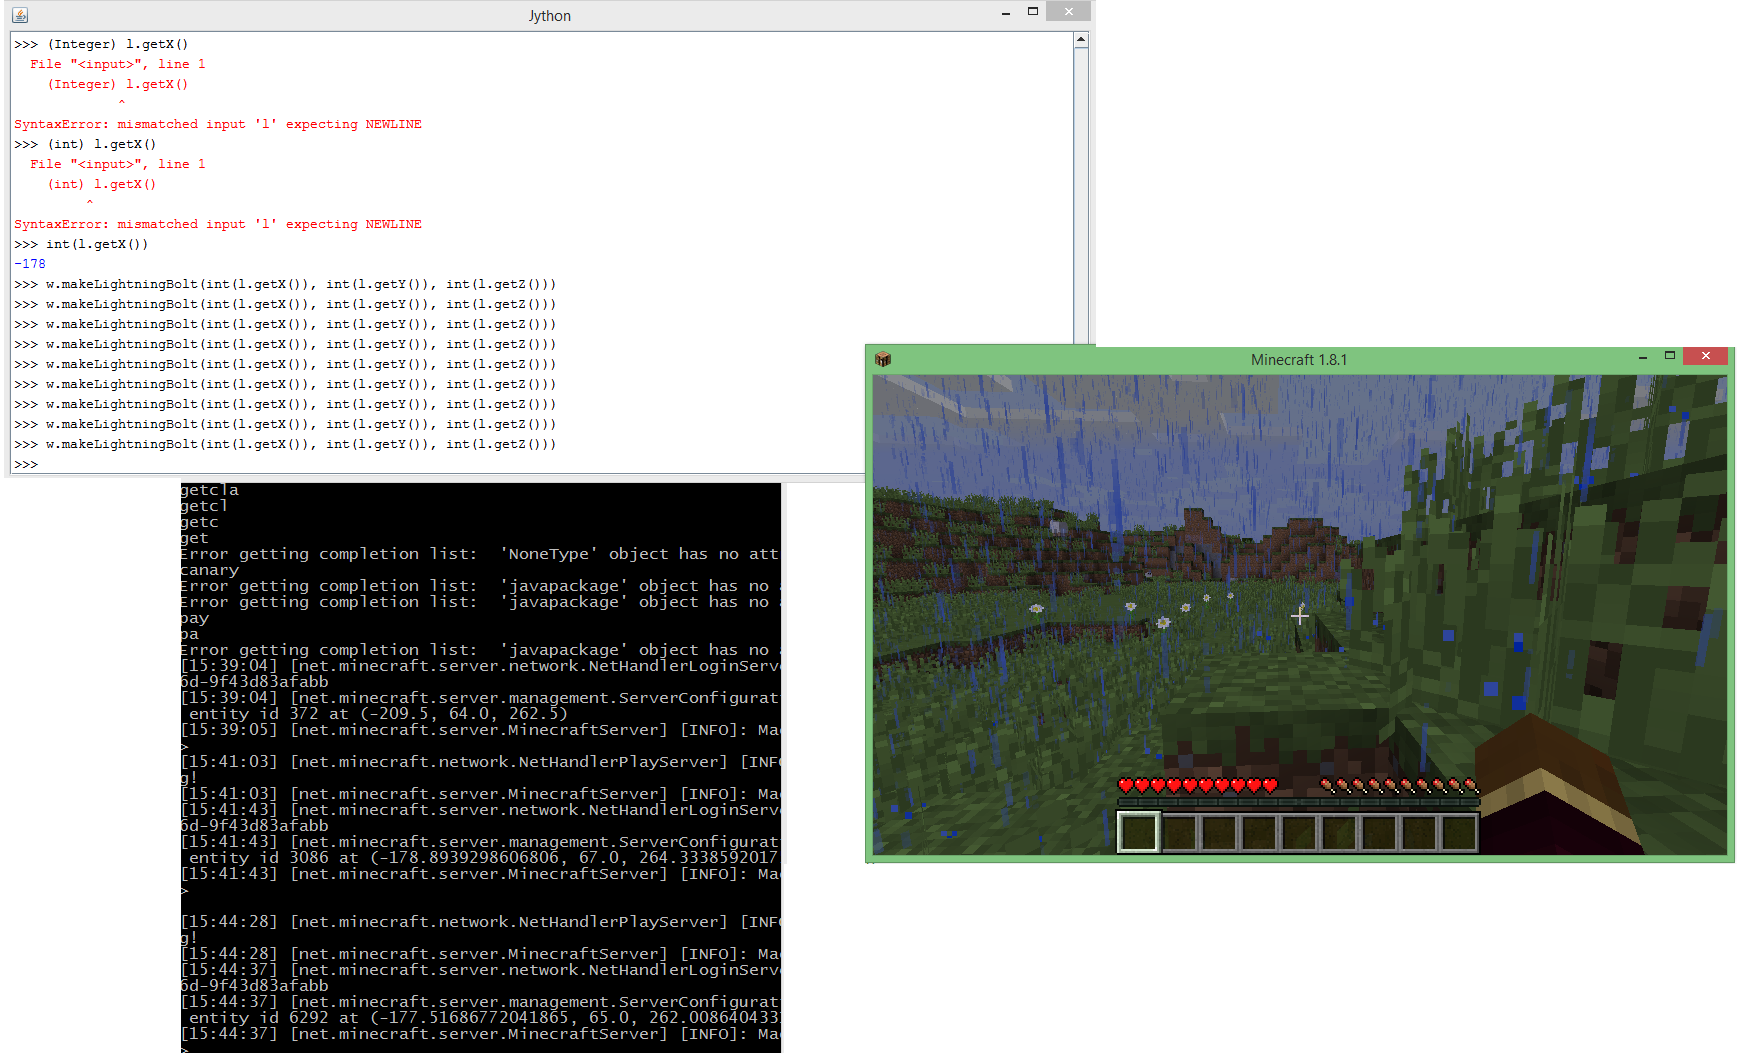
Here’s what it should look like when everything’s started up: the Canary server console window, Minecraft, and the interpreter console where you can type Python commands.
Example Usage
The following Python code shows some things you can do from the console using the Canary API. For more inspiration and ideas, you can look over the Canary API docs.
First of, you’ll want to start of by making sure all your imports are ready to go:
from net.canarymod import Canary
from net.canarymod import LineTracer
from net.canarymod.api.world.blocks import BlockType
from net.canarymod.api import GameMode

from time import *
from random import *
from math import *

# Check if the the main object can be found:
Canary
You might also want to set up some helper variables for quick access:
s = Canary.getServer()
w = s.getDefaultWorld()
p = s.getPlayer("Macuyiko")
You can now do things such as:
s.broadcastMessage("An administrator is present... be aware")
w.setTime(1)
w.setRaining(True)
Explosions can be created like so:
# Args: spawning entity; position; force; does world damage
# This one will not damage the player (except for fall damage)
w.makeExplosion(p, p.getPosition(), 8, True)
# This one will
w.makeExplosion(None, p.getPosition(), 8, True)
If you want to create an explosion at the position where the player is looking at, you must use another class, called LineTracer. This replaces the Bukkit way of doing things where there was a method immediately returning the position a player was looking at:
w.makeExplosion(p, LineTracer(p).getTargetBlock().getPosition(), 8, True)
It’s a good idea to create some helper functions while you’re at it:
def glp(p):
    return LineTracer(p).getTargetBlock().getPosition()
def gpp(p):
    l = p.getPosition()
    return [int(round(l.getX())),
        int(round(l.getY())),
        int(round(l.getZ()))]
Which then allows to do:
for i in range(0, 20):
    w.makeExplosion(p, glp(p), 6, True)
    w.makeLightningBolt(glp(p))
    sleep(1)
Creating blocks is also pretty easy. The following will spawn some pillars around the player complete with lightning:
for i in range(0, 20):
    pos = gpp(p)
    pos[0] += randint(-10,10)
    pos[2] += randint(-10,10)
    for z in range(pos[1] - 10, pos[1] + randint(5,10)):
        w.setBlockAt(pos[0], z, pos[2], BlockType.CrackedStoneBrick)
    w.makeLightningBolt(pos[0], pos[1], pos[2])
    sleep(1)
Whereas the following creates a wall around the player:
pos = gpp(p)
for z in range(pos[1]-20, pos[1] + 5):
    for x in range(pos[0]-10, pos[0]+10):
        w.setBlockAt(x, z, pos[2]+10, BlockType.CrackedStoneBrick)
        w.setBlockAt(x, z, pos[2]-10, BlockType.CrackedStoneBrick)
    for y in range(pos[2]-10, pos[2]+10):
        w.setBlockAt(pos[0]+10, z, y, BlockType.CrackedStoneBrick)
        w.setBlockAt(pos[0]-10, z, y, BlockType.CrackedStoneBrick)
Finally, it’s even possible to render fractals. I’m making a MandelBulb here from code I borrowed online:
def vir(l, h, s, o):
    return l+((h-l)/float(s))*float(o)

def rp(cx, cy, cz, maxit, mandpow):
        x = 0
        y = 0
        z = 0
        for i in range(0, maxit):
            if (x*x+y*y+z*z) >= 2.0:
                return i
            r = sqrt(x*x + y*y + z*z )
            theta = atan2(sqrt(x*x + y*y) , z)
            phi = atan2(y,x)
            rpow = pow(r,mandpow)
            newx = rpow * sin(theta*mandpow) * cos(phi*mandpow)
            newy = rpow * sin(theta*mandpow) * sin(phi*mandpow)
            newz = rpow * cos(theta*mandpow)
            x=newx+cx
            y=newy+cy
            z=newz+cz
        return maxit

def renderFractal(w, pos, size=64, rng=1.2, maxit=10, mandpow=8.0):
    # http://www.skytopia.com/project/fractal/mandelbulb.html
    xlow=-rng
    xhigh=rng
    ylow=-rng
    yhigh=rng
    zlow=-rng
    zhigh=rng
    for z in range(0, size):
        s.broadcastMessage('z = '+str(z))
        for y in range(0, size):
            for x in range(0, size):
                fy = vir(ylow, yhigh, size, y)
                fz = vir(zlow, zhigh, size, z)
                fx = vir(xlow, xhigh, size, x)
                val = rp(fx, fy, fz, maxit, mandpow)
                if val >= (maxit-1):
                    w.setBlockAt(pos[0]-size/2+x, pos[1]-size/2+z, pos[2]-size/2+y, BlockType.WoolWhite)
                else:
                    w.setBlockAt(pos[0]-size/2+x, pos[1]-size/2+z, pos[2]-size/2+y, BlockType.Air)
Use like so:
pos = gpp(p)
pos[1] += 100 #Put the fractal in the air a bit
renderFractal(w, pos)
Be careful though when specifying a very large size. Python is not the fastest of languages (at least not the Jython implementation), so rendering a 256^3 sized fractal will take a while.